在线代码执行器
需求背景 在处理一些简单代码或者项目需要有运行代码能力的时候,需要立即获得这段代码的执行结果,如果每次都是使用命令行手动编译、配置环境、打开 IDE 来运行,会浪费大量时间,所以需要一个工具能在线执行常用的代码,运行各种常见的编程语言 不止要做一个在线代码执行器,还可以封装成一个 starter,让其他服务可以轻松的接
需求背景
在处理一些简单代码或者项目需要有运行代码能力的时候,需要立即获得这段代码的执行结果,如果每次都是使用命令行手动编译、配置环境、打开 IDE 来运行,会浪费大量时间,所以需要一个工具能在线执行常用的代码,运行各种常见的编程语言
不止要做一个在线代码执行器,还可以封装成一个 starter,让其他服务可以轻松的接入提供的代码执行器
需求分析
功能需求
两个最核心的功能:
-
支持大多数常用代码的运行能力
-
返回运行结果或者相关错误信息
安全需求
-
内存限制
-
时间限制
-
权限限制
技术选型
-
SpringBoot
-
Docker 容器隔离运行代码
-
docker-java 调用本地 Docker 的功能
核心设计
-
编译命令(不用编译的语言可以设置为空)
-
运行命令
-
保存的文件名(为了兼容不同语言的代码文件)
可以设计一个枚举,在枚举中编写不同语言的语言类型,保存的文件名,以及编译和运行的命令
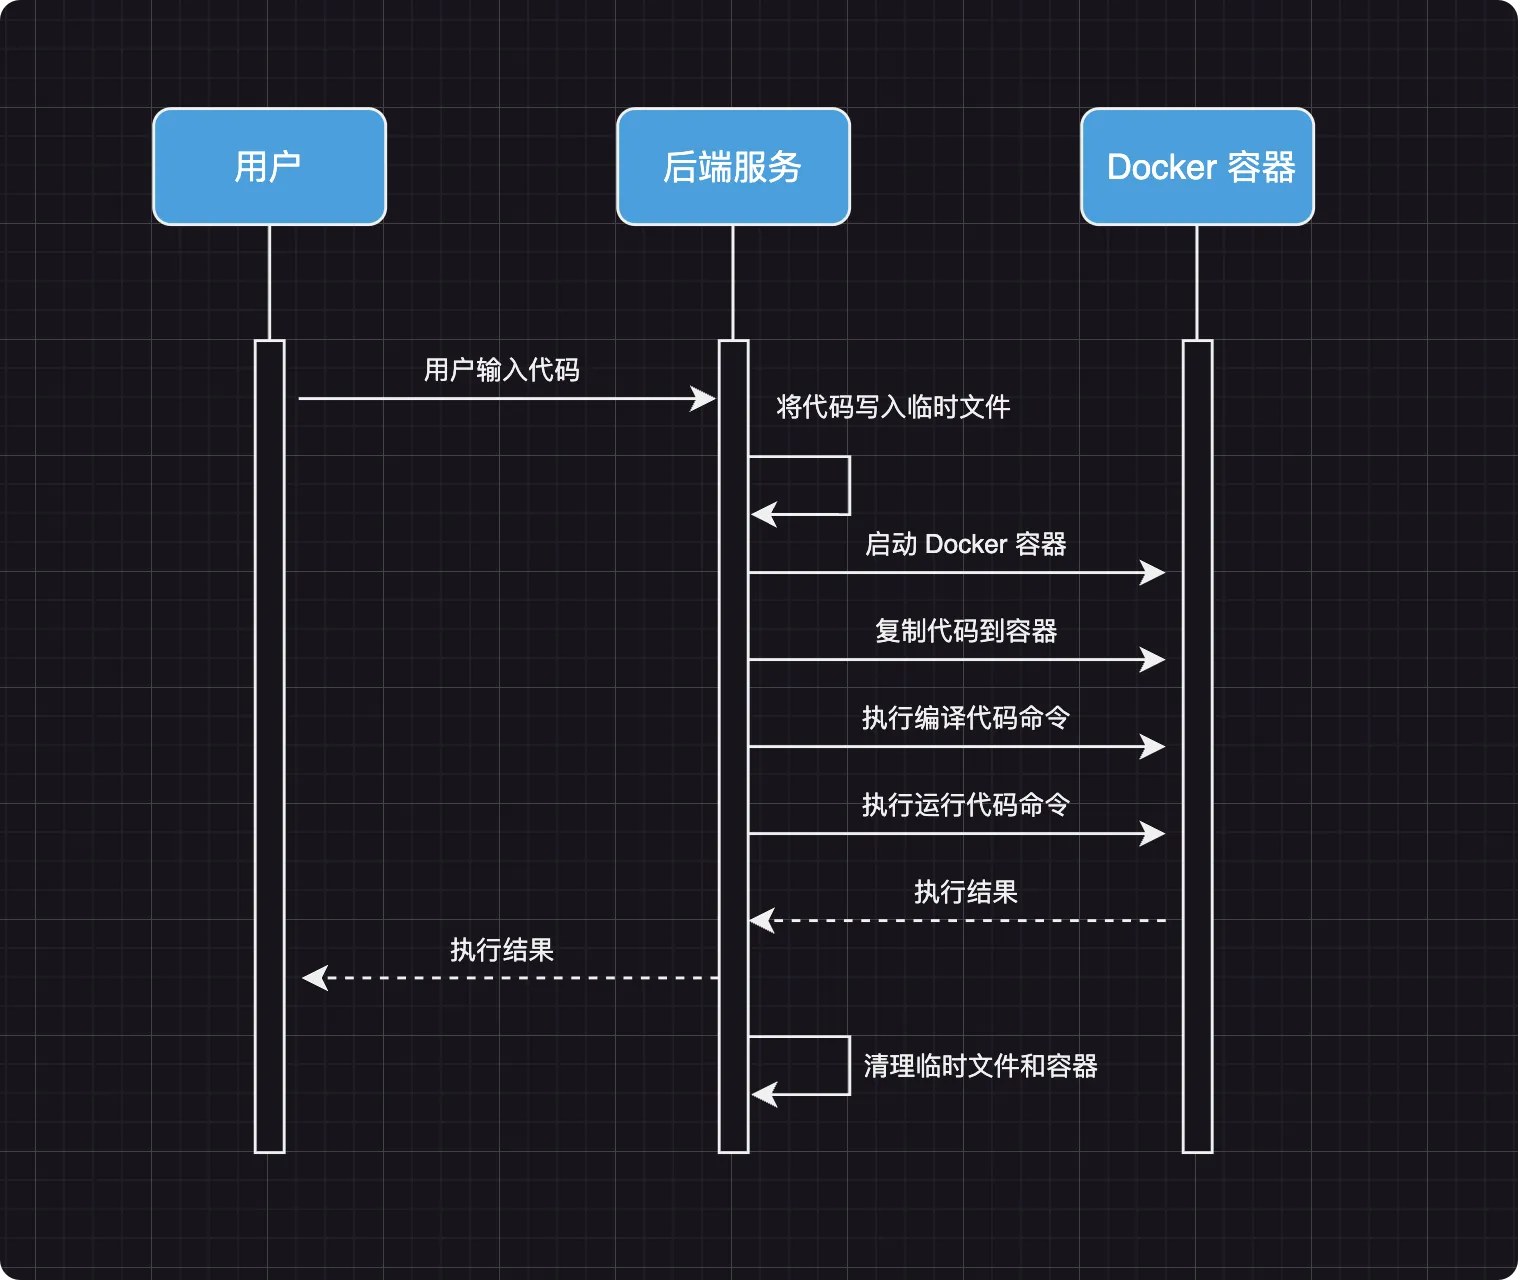
业务流程
-
用户输入代码
-
后端将代码写入宿主机的临时文件中
-
启动一个 Docker 容器
-
将临时文件复制到容器中
-
在容器中运行编译代码命令
-
在容器中运行执行代码命令
-
后端返回执行结果
-
清理临时文件以及 Docker 容器
功能开发
准备镜像
1、使用一个大而全的镜像,下面是 Dockerfile 文件的内容:
# 创建 Ubuntu 镜像
FROM ubuntu:20.04

# 修改默认终端为 bash
SHELL ["/bin/bash", "-c"]

# 设置为中国国内源
RUN sed -i s@/ports.ubuntu.com/@/mirrors.aliyun.com/@g /etc/apt/sources.list
RUN sed -i s@/archive.ubuntu.com/@/mirrors.aliyun.com/@g /etc/apt/sources.list
RUN sed -i s@/security.ubuntu.com/@/mirrors.aliyun.com/@g /etc/apt/sources.list

RUN apt-get clean

# 更新镜像到最新的包
RUN apt-get update
RUN apt-get update -y

# 安装需要的包
RUN apt-get install software-properties-common -y
RUN apt-get install zip unzip curl wget tar -y

# 安装 Python
RUN apt-get install python python3-pip -y

# 安装 C
RUN apt-get install gcc -y

# 安装 C++
RUN apt-get install g++ -y

# 安装 Java
RUN apt-get install default-jdk -y
RUN apt-get install default-jre -y

# 安装 Node.js
RUN curl -fsSL https://deb.nodesource.com/setup_16.x | bash -
RUN apt-get install nodejs -y

# 安装 Go
RUN apt-get install golang -y
ENV GOCACHE /box
ENV GOTMPDIR /box

# 更新包
RUN apt-get clean -y
RUN apt-get autoclean -y
RUN apt-get autoremove -y

# 设置默认工作目录
WORKDIR /box2、查看容器占用的资源
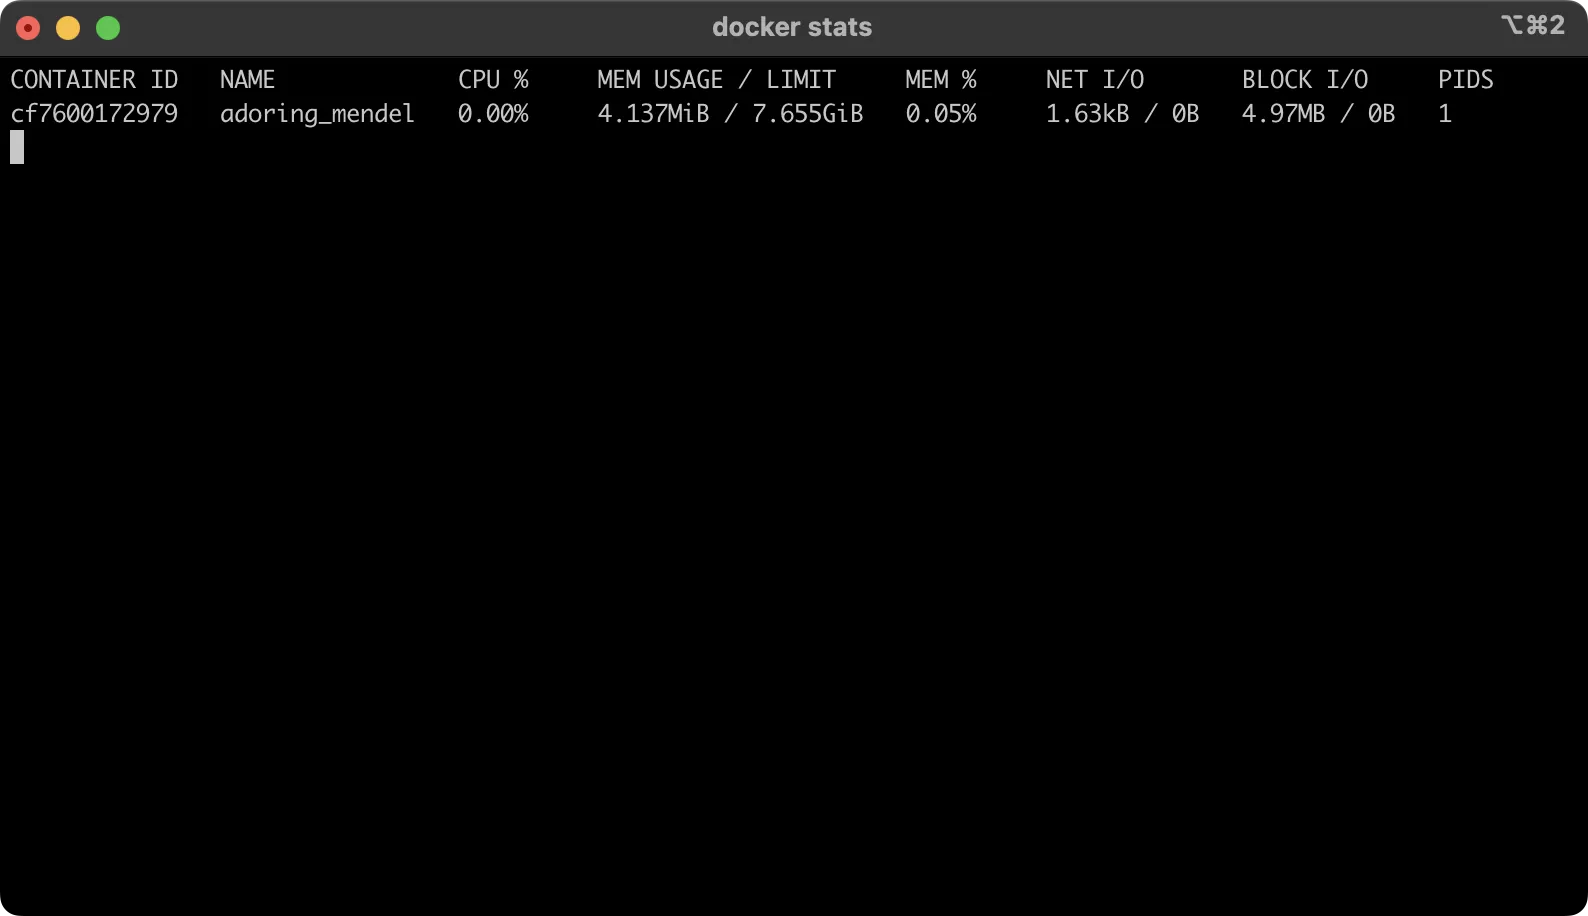
只占用几 MB,就算同时运行上百个容器,也完全可以接受
3、引入相关依赖
<dependencies>
    <!--Java 操作 Docker-->
    <dependency>
        <groupId>com.github.docker-java</groupId>
        <artifactId>docker-java</artifactId>
        <version>3.3.0</version>
    </dependency>
    <dependency>
        <groupId>com.github.docker-java</groupId>
        <artifactId>docker-java-transport-httpclient5</artifactId>
        <version>3.3.0</version>
    </dependency>
    <dependency>
        <groupId>org.springframework.boot</groupId>
        <artifactId>spring-boot-autoconfigure</artifactId>
    </dependency>
    <dependency>
        <groupId>org.springframework.boot</groupId>
        <artifactId>spring-boot-configuration-processor</artifactId>
    </dependency>
    <dependency>
        <groupId>org.projectlombok</groupId>
        <artifactId>lombok</artifactId>
        <optional>true</optional>
    </dependency>
    <dependency>
        <groupId>org.apache.commons</groupId>
        <artifactId>commons-lang3</artifactId>
    </dependency>
    <!-- https://hutool.cn/docs/index.html#/-->
    <dependency>
        <groupId>cn.hutool</groupId>
        <artifactId>hutool-all</artifactId>
        <version>5.8.8</version>
    </dependency>


    <dependency>
        <groupId>org.springframework.boot</groupId>
        <artifactId>spring-boot-starter-test</artifactId>
        <scope>test</scope>
    </dependency>
</dependencies>4、完整实现代码
https://github.com/kbws13/OnlineJudge-code-sandbox
安全优化
-
内存限制:限制 60MB,如果每个容器占用了 60MB,也能支持几十个容器同时启动
-
时间限制:设置容器在执行命令时的等待时间,超过这个时间不再执行,直接返回数据,后面直接清除掉容器就行
-
权限限制:所有执行的用户代码都在容器中进行,且没有挂载到宿主机的文件系统,因此不可能获取到宿主机的敏感数据
封装为SDK
在配置类上面添加配置的注解
@Slf4j
@Data
@ConfigurationProperties(prefix = "codesandbox.config")
@Configuration
public class DockerSandbox {
}在 resources 目录下新建META-INF/spring目录,然后新建org.springframework.boot.autoconfigure.AutoConfiguration.imports文件,在文件中将 DockerSandBox 引入就行(这是 2.7.0 之后写法)
执行mvn install命令,将项目安装到本地仓库
创建一个 demo 用于测试
1、引入依赖
<dependency>
  <groupId>xyz.kbws</groupId>
  <artifactId>oj-code-sandbox</artifactId>
  <version>1.0</version>
</dependency>2、配置 yml
也可以不配置,因为有默认数据
codesandbox:
  config:
    image: codesandbox:latest
    timeout-limit: 3
    time-unit: seconds
    # memory limit default: 1024 * 1024 * 60 MB
    memory-limit: 62914560
    # The following code does not need to be configured, but only provides an extension(下面这段代码不用配置,只是提供了扩展)
#    memory-swap: 0
#    cpu-count: 1
3、执行测试
import cn.hutool.core.io.resource.ResourceUtil;
import com.yuyuan.executor.DockerSandbox;
import com.yuyuan.executor.ExecuteMessage;
import com.yuyuan.executor.LanguageCmdEnum;
import org.junit.jupiter.api.Test;
import org.springframework.boot.test.context.SpringBootTest;

import javax.annotation.Resource;
import java.nio.charset.StandardCharsets;


@SpringBootTest
class DockerSandboxTest {

    @Resource
    private DockerSandbox dockerSandbox;

    @Test
    void testJava() {
        String code = ResourceUtil.readStr("languageCode/Main.java", StandardCharsets.UTF_8);
        ExecuteMessage execute = dockerSandbox.execute(LanguageCmdEnum.JAVA, code);
        System.out.println(execute);
    }
}最终效果:

性能分析
问题分析
-
当访问量提升的时候,异常率就随之提升,最高的时候可以接近 100%
-
吞吐量不足
在线运行代码消耗的是 CPU 资源,且编译比运行占用的资源多了将近 1/3
主流程中有一个清理临时文件以及 Docker 容器的操作可以用异步处理
将 DockerSandBox 类中的cleanFileAndContainer方法改为异步:
/**
 * 清理文件和容器
 */
private static void cleanFileAndContainer(String userCodePath, String containerId) {
    CompletableFuture.runAsync(() -> {
        // 清理临时目录
        FileUtil.del(userCodePath);

        // 关闭并删除容器
        DOCKER_CLIENT.stopContainerCmd(containerId).exec();
        DOCKER_CLIENT.removeContainerCmd(containerId).exec();
    });
}这样做后吞吐量确实增加了一些但不多
考虑一下之前的流程,每次请求都会创建一个新的容器,这样不仅效率低而且浪费了大量资源
容器池设计
其实分析业务流程就可以发现,性能瓶颈是在创建和销毁资源的时候出现的,那我们可以借助池化思想,设计一个容器池(就像线程池那样)进行资源预热,在请求量很大的情况下,超出系统可处理的请求,也可以在这个池子中等待,直到资源可用时继续从池子中取出;操作完成后容器可以复用,就避免了重复创建容器,销毁容器
需求如下:
-
获取容器:当需要使用容器时,从池中获取一个容器。如果池中容器足够,就立即返回;否则,可能会加入等待队列或者触发扩容
-
容器用完之后清空所有代码数据
-
扩容:当池中容器不足且排队队列太长时,可以进行扩容操作,向池中添加新的容器。同时对扩容的容器进行时间判断,如果超出一定时间则销毁
-
销毁:对于池中容器,当超过一段时间后,需要进行销毁
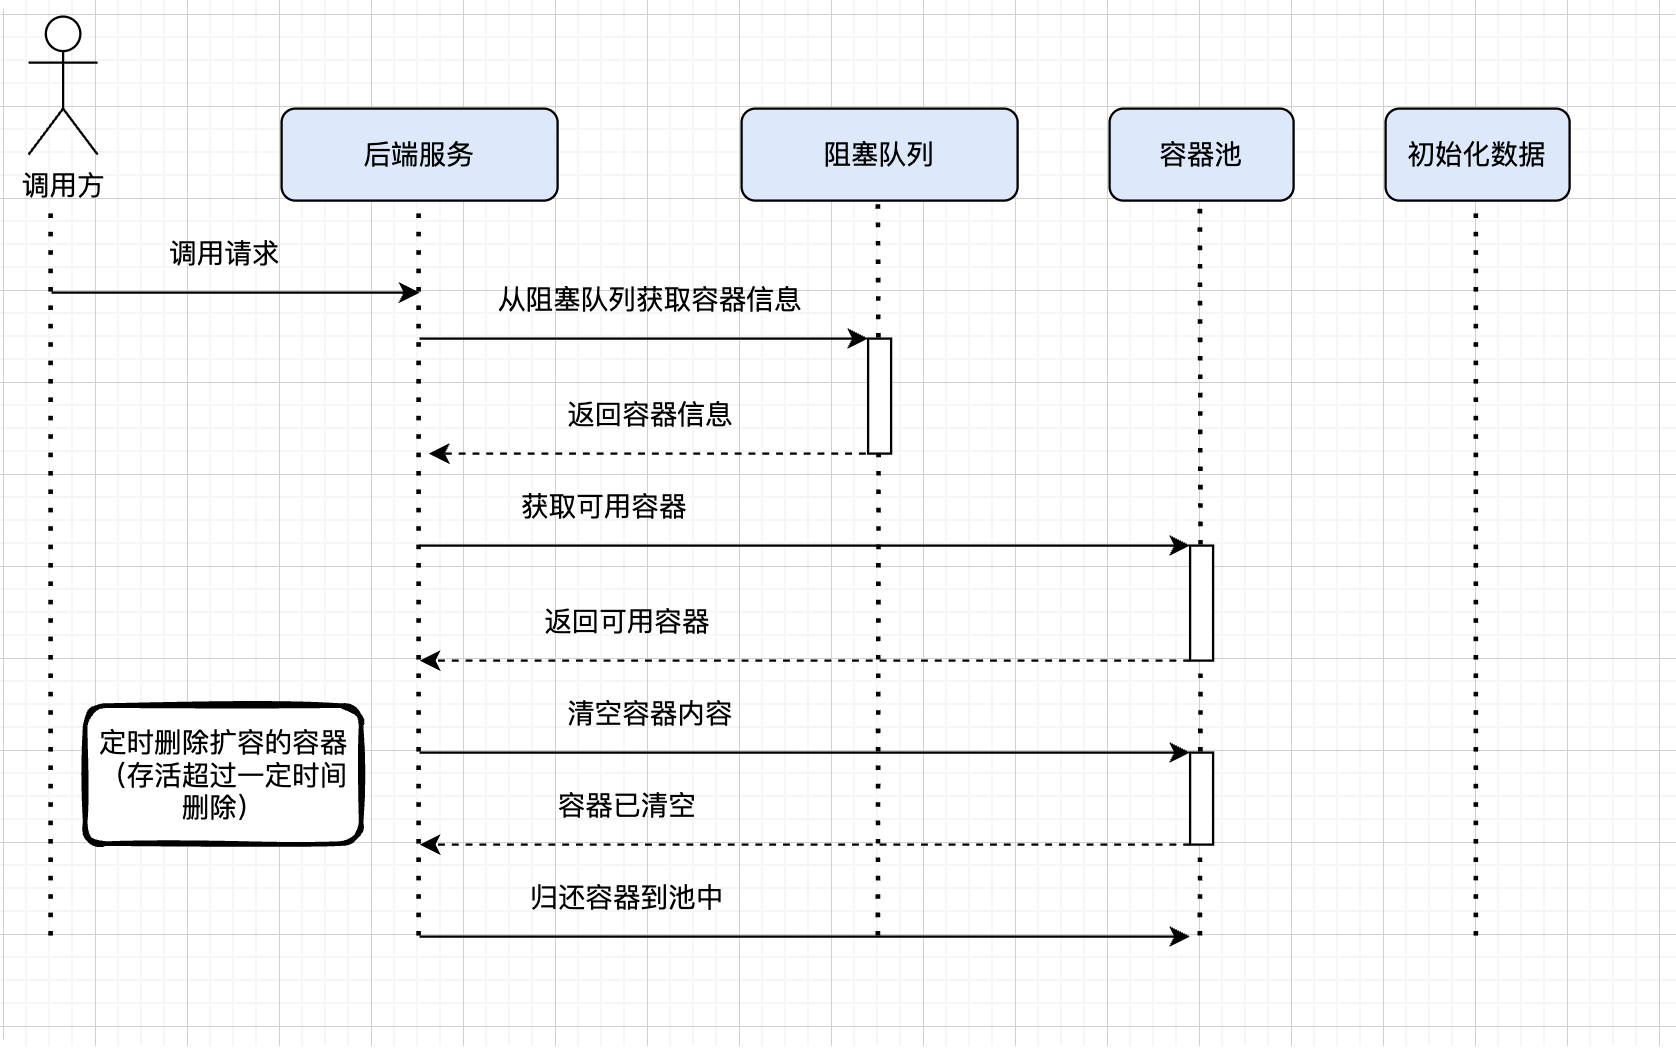
设计思路:
-
使用阻塞队列:使用阻塞队列管理池中的容器(初始容器数量:corePoolSize),确保线程安全
-
获取容器:在获取数据的时候,首先检查池中是否有足够的容器可用。如果可用则直接返回,否则可能需要排队,如果队列过长则触发扩容
-
扩容:当池中的容器不足时,可以触发扩容操作,想池中添加新的容器。扩容时,可以根据需求创建容器,不超过 maximumPoolSize
-
销毁:设计一个定时任务,定期(keepAliveTime)检查池中的容器,销毁池中存在时间超过一定限制的扩容容器
容器池流程:
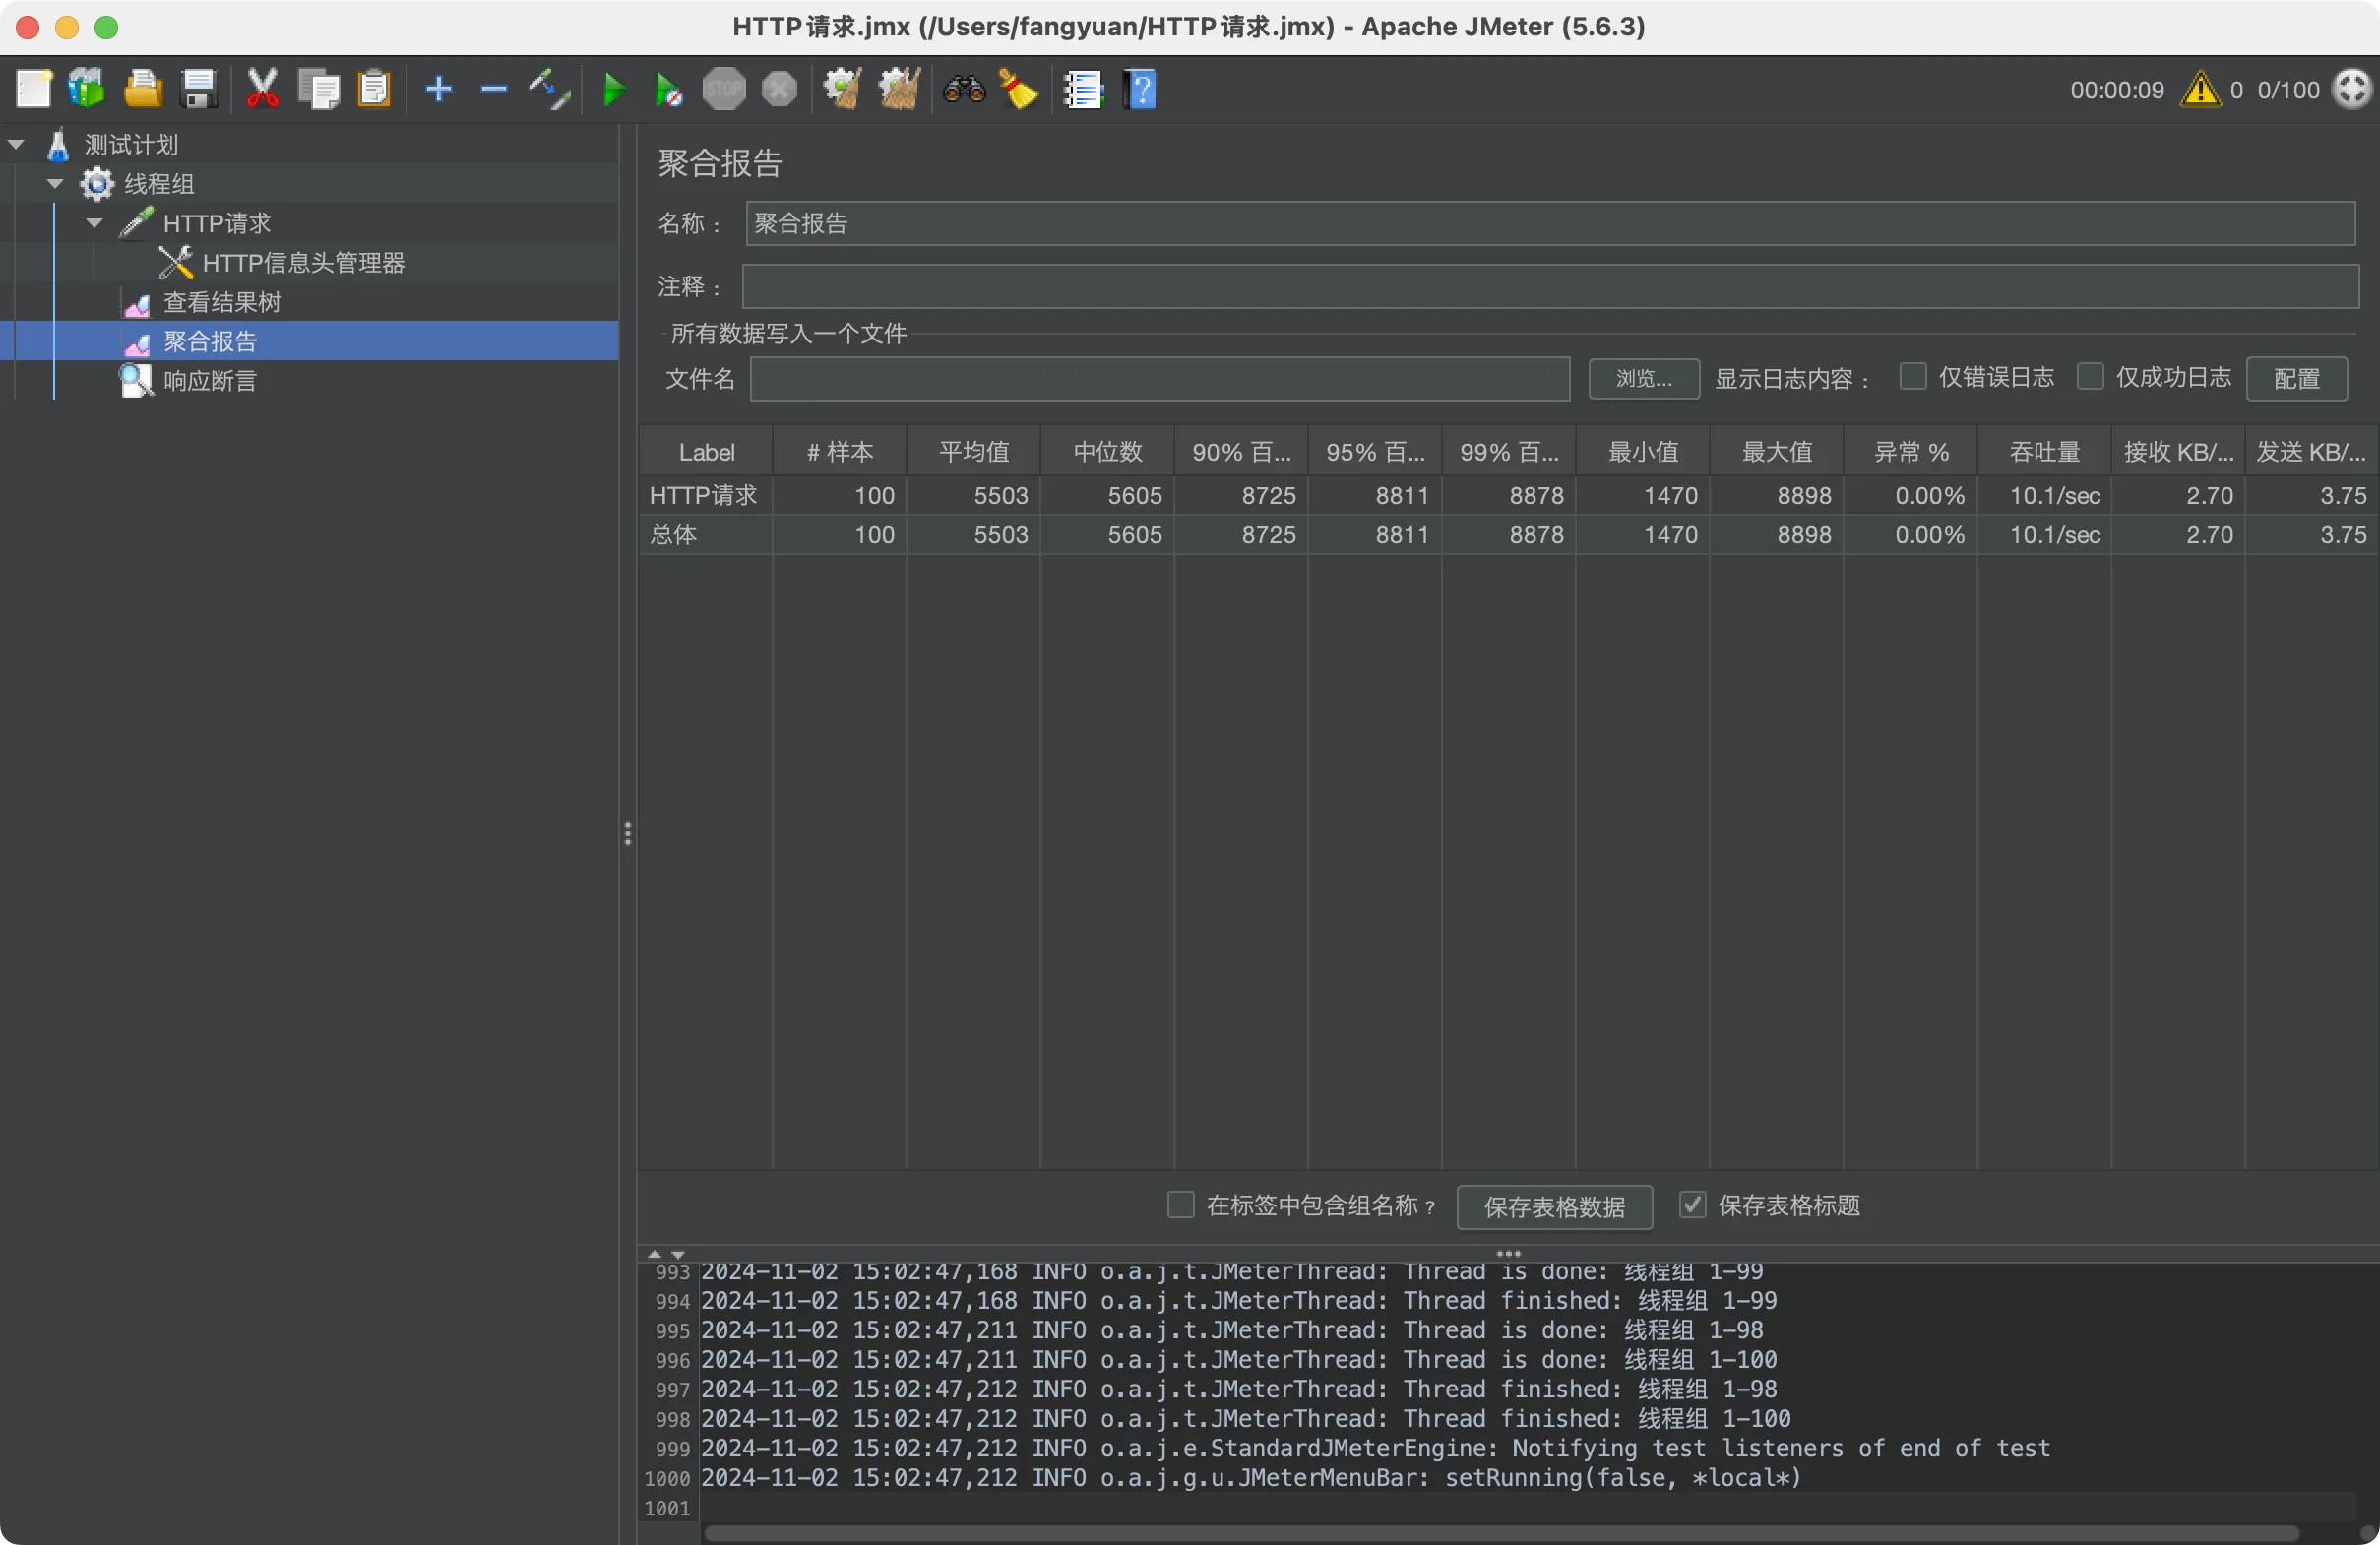
测试
继续优化设计
优雅关闭
通过实现ApplicationListener接口,在关闭项目的时候删除容器和临时代码文件
代码如下:
package xyz.kbws.executor;

import cn.hutool.core.io.FileUtil;
import lombok.extern.slf4j.Slf4j;
import org.springframework.context.ApplicationListener;
import org.springframework.context.event.ContextClosedEvent;
import org.springframework.stereotype.Component;

import javax.annotation.Resource;

/**
 * @author kbws
 * @date 2024/11/2
 * @description:
 */
@Slf4j
@Component
public class CleanContainerListener implements ApplicationListener<ContextClosedEvent> {

    @Resource
    private DockerDao dockerDao;

    @Resource
    private ContainerPoolExecutor containerPoolExecutor;

    @Override
    public void onApplicationEvent(ContextClosedEvent event) {
        // 清理所有容器以及残余文件
        containerPoolExecutor
                .getContainerPool()
                .forEach(containerInfo -> {
                    FileUtil.del(containerInfo.getCodePathName());
                    dockerDao.cleanContainer(containerInfo.getContainerId());
                });
        log.info("container clean end...");
    }
}